A Neve VXS console in your DAW? With bx_console from Brainworx yes, you can in fact get that legendary Neve sound, in your DAW.
The Neve VXS was an analogue mixing console that somewhat bridges the gap between classic vintage Neve desks and modern Neve desks. Neve consoles have a signature fat low end, a crystal clear and open high end, and when a mix is brought together it has that signature huge in your face Neve sound.
The strips on the Neve VXS boast a full compression and limiter section, a very natural gate, and a 4 band equalizer with fully parametric mid-range bands.
So let’s talk about the plugin:

From left to right, let’s start at the top left.
The Filters

The green lined knobs are the low pass and high pass filter controls, and include a division by three and multiplication by three controls for the low and high pass filter, respectively. I found that they are more prominent (steeper slopes of the filter curve) than the softer slope of SSL (Solid State Logic) channel strip filters.
In the demo mixes I made for this review (scroll down the page) I ended up low passing all the guitars at 9 khz instead of 7.5 to 8 khz as I usually do with SSL type HP and LP filters (high pass and low pass filters, respectively). While this felt like somewhat of a problem at first, I quickly found how useful this actual precision was. Overall, the filters are very good.
The Gate
Next down, we have 4 buttons. Starting on the top left, we have the “Key” control which controls whether the gate is triggered by the sidechain, or the audio input signal. This Feature is very useful when mixing kick drums and sub bass.
Under that, we have the INV control which also is a gate control feature. It switches between a normal gate that cuts off at a certain point and with the INV button pressed; it outputs the content that would be cut in the normal mode. There are many situations where this would be useful, for instance a pumping sidechain or even a swell effect when it cuts off the initial input transient the attack of the sound.
The HYST control (taken directly from the manual with an extension on the subject by the devoted team at Brainworx): “continuous, 0 db to +25 dB Sets a dedicated opening threshold for by setting its distance, relative to the closing threshold. This can be a useful way to avoid gate stuttering. Turning the knob fully counterclockwise switches to the expander mode.”
Further on this control by the Brainworx team: “The difference between gate and expander: the gate reacts to the signal by its predetermined range amount lowering the signal by the range value once crossing the threshold. So if the range is set to 20db and 2db cross the threshold the amount will be lowered by 20db.
The expander reacts to the signal by its ratio amount lowering the signal by the ratio value once crossing the threshold. So if the ratio is set to 20:1 and 2db cross the threshold the amount will be lowered by 40db… 20db per each db crossing the threshold…
A gate is a static gain control while an expander is a variable gain control.”
The Threshold control under that controls the audio level that the gain closes and reduces the level of the audio.
The RGE control simply determines how much you want the gate to take down in level.
Finally, the REL knob controls how long the gate maintains its attenuation of the audio signal.
Yes, this is quite the comprehensive explanation, and I do so because the gating section is complex but very useful if you know hot operate it properly.
The Dynamics
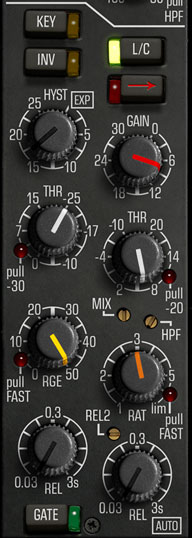
Let’s start with a little intro to Neve compressors. Most Neve compressors are known for their transparency and how they can smoothly reduce the dynamic range without getting overly pumpy or adding any other artifacts. While the compressor on bx_console has these characteristics, I find it has a definite punch to it, and is also a bit less forgiving than other hardware and plugin Neve and Neve style compressors I have used.
The L/C Button enables or disables the limiter /compressor section.
The gain controls the makeup gain for compensating for lost levels when using the compressor or limiter.
The THR knob controls the threshold, which again, like the threshold control of the gate section, controls the level at which the compressor begins to attenuate the audio passing through.
Now we get to the really great part about this compressor, the Mix trimmer control and the HPF control. The Mix control allows you blend in the uncompressed signal to the compressed signal, and create parallel compression. This is great for adding sustain to audio without crushing out all the dynamics and transients. The HPF control sets the high pass filter cut off for the sidechain of the compressor, meaning you can control what frequencies you don’t want the compressor to track. This is useful if you are mixing bass heavy content and want the other frequency ranges to control the level of compression and let the bass come through, instead of the bass dominating and crushing all the audio.
Next down, we have the ratio control. The ratio controls how much compression is applied to your signal after the signal passes the threshold. For instance, with a compression ratio of 3:1, it will take 3 decibels over the threshold for the signal to have an output of 1 decibel over the threshold.
Now we have the REL1, this knob controls how long the compression is applied even after the signal drops below the threshold.
The plugin also offers a REL2 control, which I will take the explanation from the manual “continuous, 10 dB to 60 dB Lets the user define a second threshold below the LC Threshold where the release curve switches from linear to exponential characteristic. In our hardware console, this is set to 20 dB. Changing this value totally changes the release behavior of the compressor and, therefore, the sound. The adjustable REL2 is one of the modifications added to the plugin that is not originally offered on the hardware console”. So it basically adds even more versatility to an exceptional compressor.
The Equalizer (Don’t worry, I’ll be brief here)

Neve EQs are legendary. Some argue they are the absolute best and the absolute sweetest (and insert your own descriptor here because I have heard perhaps thousands more) equalizers in the world. Now I don’t completely agree, but I do like the one on this plugin.
The EQ section has basic semi-parametric high and low bands with two fully parametric mid-range bands. Not unlike a Solid State Logic EQ, and many stock EQ plugins. This arrangement is no indication of how the EQ sounds though.
There are two buttons above the high frequency controls. The left button is the PRE DYN switch, which controls whether the EQ is placed before or the dynamics section. By default it is off and the EQ is after the compressor. The button to the right switches between the input audio to the sidechain of the compressor, and the EQed audio going to the sidechain. You can actually control what frequencies are fed to the sidechain, and how much audio is compressed based on the level of those frequencies. There are many uses for this, but I couldn’t give you an exact example because this feature is even somewhat beyond me.
Now let’s get to the EQ controls themselves. The high and low bands have the same basic control scheme, a level control (unmarked) for determining how much cut or boost you want, a frequency control, a HI-Q button that sharpens the slope of the shelf, or peak if you select the button to the right.
There is some magic with these bands. The high band can add a lot of air and brightness without getting too harsh, and is commonly used with moderate to extreme settings to a sweet and clear top end to vocals, drums, and other instruments where some open presence and air is desired. The low band can add a lot of weight and thump to a sound, and is best used subtly, but when used at extreme settings it is incredibly powerful.
The mid bands are fully parametric, meaning you can control the frequency, the bandwidth (Q), and level of each band. I wouldn’t say that they have any “magic” or notable character, but they are useful and round out a great EQ.
The “Analogue”
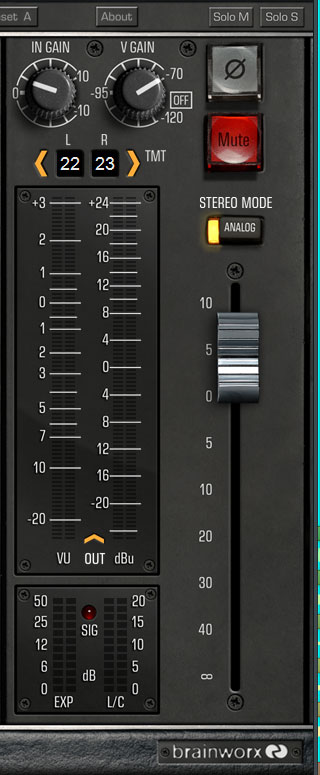
Whew! We’ve made it this far, and I apologize if I have thrown a lot of information at you in a short period of time, but this plugin is actually comprised of 4 distinct sections: the Gate, Compressor/Limiter, the Equalizer, and finally the Input/Output level section with the “analogue” controls, and finally the meter.
The input control is marked IN GAIN and controls how much input level you want into the entire plugin, the output gain is the channel fader.
Now we get to the V GAIN control, which sets the level in which the simulated “analogue” hiss occurs. Now you may be thinking “Why on earth would I want hiss in my DAW?!”, the simple explanation to that is the Neve VXS console had it, and it can round out your high end and make the listener perceive things as less harsh.
The other “analogue” control is above the meter, and it controls which of the 72 channels you are emulating on the console. The reasoning behind this feature is the compounding artifacts (colour and saturation) will create a more realistic console sound and experience, because the hardware had these artifacts also. You can very much tell the difference between the strip variation when switching through, and you may find some strip numbers work better than others for some content.
The Stereo Mode Analog as explained by the brainworx team: “…It’s the minuscule differences in component tolerances that change the response characteristics of the modules within the channel. And that is exacerbated when in Analog mode where two adjacent channels have different responses, as one would find on an analog desk. So in short, the ANALOG stereo mode just means two different channels (with the same knob settings), whereas DIGITAL is two identical channels.”
My Thoughts (What I think you are here to read)
Overall,the Brainworx bx_console is a great plugin, and offers features that surpass other plugins and companies lack in their emulations of analogue hardware. Some of my favourite parts of the plugin are actually “under the hood” and cannot be controlled, like the saturation characteristics when you slam the strip with too much input gain, the subtle overall Neve colour to the sound, and the thought that went into simulating a Neve VXS channel strip from Insert to its output for summing.
The Good
The plugin sounds amazing, it’s incredibly versatile, and offers a compact user interface. The added trimmers which the hardware lacked make the plugin a powerful modern tool along with being a great vintage mixing tool. You can do an entire mix with just instances of this plugin, as with the real console, and have the same console workflow.
The Bad
The plugin is very complex; it has enough features and sections to make four or five different individual plugins. One must read the manual before fully taking advantage of every feature, and even then the explanations of the controls are confusing. The plugin is also hard to differentiate between controls for the gate and dynamics section, and the buttons are minimally labeled and have to be thoroughly researched in the manual to understand what they really do. The lack of an analogue summing mixer emulation plugin left a major component of classic Neve out and was disappointing.
Notes from the Brainworx team:
“Summing amp:
We have some of the behaviour captured in each channel via the Noise control. The VXS indeed does not produce a lot of THD / Distortion. Also, the real desk doesn’t ‘drive’ well into clipping and distortion smoothly, it just starts screaming at some point. That’s why we didn’t waste valuable CPU/DSP usage on it. If we ever model a console that needs the drive feature we’ll capture it. Compare one instance of the ACME compressor with one instance of the console with regards to CPU consumption…”
This was good information; though I do wish the strip got a little dirtier (even if it does scream) that was not a deal breaker.
I will do CPU usage comparisons between the bx_console and ACME compressor in the future, but based on the performance of the strip itself against the amount of resources it uses, the plugin is extremely efficient.
Audio demos:
[fusion_builder_container hundred_percent=”yes” overflow=”visible”][fusion_builder_row][fusion_builder_column type=”1_1″ background_position=”left top” background_color=”” border_size=”” border_color=”” border_style=”solid” spacing=”yes” background_image=”” background_repeat=”no-repeat” padding=”” margin_top=”0px” margin_bottom=”0px” class=”” id=”” animation_type=”” animation_speed=”0.3″ animation_direction=”left” hide_on_mobile=”no” center_content=”no” min_height=”none”]
EDM-elody by Kyle Conklin
[/fusion_builder_column][fusion_builder_column type=”1_1″ background_position=”left top” background_color=”” border_size=”” border_color=”” border_style=”solid” spacing=”yes” background_image=”” background_repeat=”no-repeat” padding=”” margin_top=”0px” margin_bottom=”0px” class=”” id=”” animation_type=”” animation_speed=”0.3″ animation_direction=”left” hide_on_mobile=”no” center_content=”no” min_height=”none”]
We’re All Doomed Metal! by Kyle Conklin
Conclusion

At $300, this plugin is a larger investment, but it is CPU friendly, and nails the sound of a Neve VXS channel strip with many added features that the original console strips did not have.
If you want the sound of a classic Neve console with modern versatility and power, or just want a more colourful and sweeter mix, this plugin is for you.
Note: Read the manual thoroughly if you decide to purchase this plugin! There are many ins and outs, and to take advantage of them to the fullest having the manual at hand for fast referencing is essential until you get the hang of this amazing channel strip.
I’d also like to thank Brainworx for their input (mostly corrections!) and letting me demo this plugin to share my thoughts with you all. I love the industry leading companies like Brainworx that creates something totally new or makes legendary sound available to everyone through exceptional digital modeling.
More info:
Brainworx bx_console plugin @ Plugin Alliance
[/fusion_builder_column][/fusion_builder_row][/fusion_builder_container]