
Possibly one of the most overlooked features in FL Studio is the sample settings inside of the Sampler channel. It’s common to quickly start adding drums to the channel rack and get right into making a drum pattern and never look back.
However, I would suggest digging a little deeper to get more out of your drum samples with a few easy steps to avoid having to put any extra effort into the mixing process later down the road.
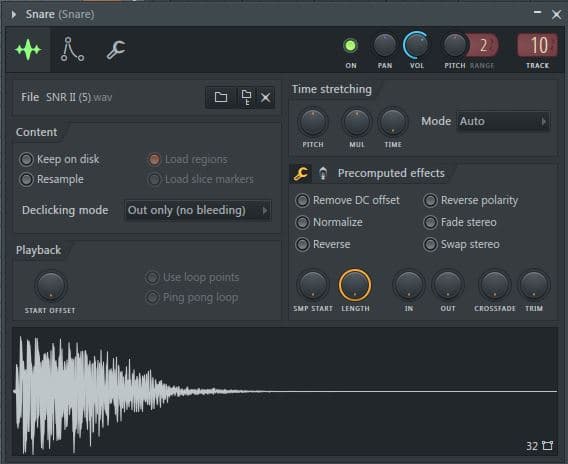
Many times, we’re using samples from all sorts of places, which tend to have each sample in a completely different key from one another. A quick way to get a more cohesive sounding drum pattern is by tuning your drums to make them sound like an actual kit. You’ll see the option to pitch your sample in the Time Stretching section, at the top right of the Sample Settings.

I simply recommend just using your ears to have each drum sample hitting a pitch that fits in the key of your music. However, some people like to pitch each sample to the key of “C” and use the piano roll to place the hits on specific notes in the key of their song. Over time, you’ll be able to just hear whether or not it’s in tune with your music without having to do so.
The next option I would explore is the length and out knob under the “wrench tool” settings. Not only will the shape the sound of the sample itself, but it also helps to create more groove in the overall drum pattern by altering the space in between drum hits.

The length knob is automatically set to full length to play the sample in its entirety. Decreasing it will chop off the tail end of the sound. Use the sample window to visually see what you’re chopping off. You won’t hear any change until you decrease the sample beyond where there is silence in the sample. Combining this with the “out” knob will allow you to reshape the tail end of the sound. Increase this to fade out the new tail you’ve created from the “length” setting to create a more natural sound.
Another important aspect in using drum samples is layering. However, sometimes we add layers that might not sound like they sit well together. Under “Playback” in the bottom right, there is a knob labeled “Start Offset.”
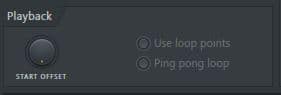
Use this to eliminate the beginning of a sample and only use the tail end, which might be what you’re looking for. Sometimes you want the beginning of one layer and the end of another. You can also achieve this with the “SMP Start” knob under the “wrench” tool. Another alternative is the “In” knob. This will fade in the sample, instead of cutting of the beginning entirely.
Still, sometimes you’ll find that the layers still aren’t meshing well with each other. One of the problems might be phase cancellation. This happens when two sounds partially or completely cancel each other out. A quick way to fix this is by clicking “Reverse Polarity,” which flips the phase of the sample. Do this to only one of the two layers to see if it sounds better or worse. Sometimes, a little cancelation is what you’re going for, so just use your ears to decide which sound you like more.
Next, to the “wrench” tool, you’ll see a switch labeled “Precomputed Effects.”

Here, you can add some extra FX before you even use your FX inserts to get your samples even closer to what you’re looking for. A quick way to get harder hitting kicks and even 808s is with the “Clip” option. Turn this on and increase the boost to clip the transients of the sample. This will create harmonic distortion and overall create a bigger sound. You can shape this sound with the “Cut” and “Res” knob, which is a lowpass filter. Also, use the previous options under the “wrench tool” to further tailor the new sound. Since you’re now clipped the transients, it might be a good decision to go back and reshape the tail end of the sample to create a new transient with the now boosted sound.
Below those settings, you’ll see an “A” and “B” switch for the “Reverb” knob. Again, just use your ears to add this effect in along with the stereo delay. I wouldn’t recommend it for kick drums or 808s. but it can be quite useful for snares, hi-hats, and other percussive elements to add more dimension to your drums.
The “POGO” knob is sort of what it sounds like. It takes the beginning and the end of the sample and moves the waveform closer together and further apart. Overall, this will change the pitch and length of the sample, so be sure to readjust those settings to keep your drum tuned and the groove you’re looking for.
The “RM Mix” and “RM Freq” knobs are for ring modulation. Once again, just use your ears and listen to the changes. It can be useful for adding a defined pitch to any of your samples by increasing the frequency focal point in a sound. It does this by cycling through a frequency over and over again, which creates a resonant peak in the sample. Use the “RM Freq” knob to select the frequency focal point and the “RM Mix” knob to mix in the amount of that modulation you want. This is usually something I use in very subtle amounts if I use it at all.
Let us know in the comments below about your experiences with the sample settings inside the sampler channel.

Boa Dica