One of the most important features in any DAW is its ability to manipulate loops and samples. FL Studio’s playlist is loaded with tools that allow you to take any basic loop to the next level, including tempo matching, time stretching, auto beat chopping and even converting audio to MIDI.
These are incredibly useful tools to help avoid copyright strikes from someone else who used the same sample loop as you. Plus, this should spark more creativity and freedom in your music production overall when using premade loops from a sample kit that countless others are also using. Perhaps these tips will even help you win a sample loop flipping contest in the future.

Usually, the first step you want to take is matching the bpm of the loop to your current project. After you add the sample to the playlist, click on the waveform icon in the top left corner of the sample. This will bring up a menu with the tempo detection and fit to tempo options on the right. Some samples, like this one, will come with tempo information embedded in it. In those cases, simply choose the first option with the word (embedded) next to the tempo. If not, simply play the beat and use the tap tempo feature by right-clicking the project BPM from the top menu and selecting “Tap.” Play the loop and tap along with the beats to get a rough estimate of the tempo. Now you can switch back to your project tempo and select the tempo range from the detect tempo menu to find the exact tempo. Alternatively, you can select the “Fit To Tempo” option instead and this will stretch the loop into the BPM of your project. From there, you can start manipulating your sample and it will remain in sync with your project BPM.

Two settings that you may want to apply to your playlist are Z-Cross and Stretch, which are located in the top left, directly above the first track. Make sure you’ve selected the waveform icon to choose “Focus Audio Clips” to see these options. The Z-Cross option allows you to snap to the zero-point crossing of your samples to prevent pops or clicks when you’re cutting or slicing. The Stretch option will allow you to drag the end of your loop to extend the sample and maintain the same pitch of the sample whenever the sample time stretch is set to “Auto” in your channel settings of the sample.
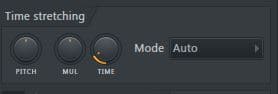
Two other time stretch modes that will achieve this are “Stretch” or “E3 Generic”, which will create a smooth sound. Experiment with all of the modes to learn how it will change the sound of the sample. For example, “Slice Stretch” will create a more distinct choppy feel as the sample plays, but will still maintain the original pitch. However, there are some instances where you wouldn’t want to maintain the pitch. For example, if you wanted to create the “halftime” effect that many producers use in Gross Beat to create a “slow motion” type sound. It does this by stretching the loop to double its size, which also pitches the loop down by 12 semitones. Still, there is an advantage of doing this in the playlist instead of Gross Beat. Gross Beat will only loop in 4 bar increments.
In the playlist, you could stretch any length you desire and create a halftime effect that uses 8 bars, 16 bars etc. I recommend using increments of 4, 8 or 16 if you’re working in 4/4 time, which is the most common time signature for most modern music production. You can achieve this slow-motion effect by switching the time stretch mode to “Resample”.
Another huge advantage of doing this in the playlist is having the ability to chop the sample and reorder it to make it more unique than the original. This is especially helpful for those who purchase loop kits and don’t want to get hit with copyright strikes from someone else who used the same loop in their track and didn’t change much of the loop. Now, you can avoid that all together by rearranging the bars of the sample. To do this, click on the waveform icon in the top left corner of the sample and hover over the “Chop” option. The simplest way to reconfigure the sample would probably be under “Time Based” and selecting “Chop In Bars.” This will automatically chop the loop into single bar slices. From there you can reorder the bars to your liking. Experiment with the other options. Some of my favorites are in the “Complex” category, like “Stutter 1,” 2 and 3.

After you’ve rearranged these bars, you might want to further manipulate the individual slices. The best way to do so is by selecting “Make Unique As Sample” from the waveform icon of any of the slices. Now you can go to the channel settings of that particular sample and change the settings for just that section of the sample. Try things like reversing the slice or sending it to its own mixer insert and adding FX.
Another way to make your version of the loop more unique is by changing the notes within the sample. This is achieved with FL Studio’s native plugin called Newtone. You can access this quickly from the waveform icon of the sample and selecting “Pitch-Correct Sample”.

This will automatically send the sample into a new instance of Newtone and will map out the pitches of the loop to each individual key. From here you can change the pitches to play completely different notes. So now you can have an entirely different composition if you wanted to. Newtone also has the ability to convert all of this information into MIDI for you and send it into the piano roll.

Simply choose the “Send To Piano Roll” icon on the very left. This is incredibly useful if you want to either change the sound playing the notes entirely or simply layer the sound with a new sound from one of your own virtual instruments. You can also save this as new audio, drag it into a new channel or add it directly to the playlist with each of the icons next to the “Send To Piano Roll” option from left to right.
Hopefully, this gives you some newfound respect for the power of FL Studio’s playlist when it comes to manipulating sample loops and making them unique to your style of production. This will avoid the mistake of simply adding drums to loops and risking copyright strikes from others who already used that exact loop in one of their beats or songs.